Static pages
Speed Build Marketplace provides a variety of components to help you quickly create SEO-optimized static pages, such as landing pages. The /components folder contains all the necessary elements, including hero sections, pricing tables, and FAQs. This modular approach allows you to easily customize and assemble your pages.
Additionally, the /libs/seo.js file is designed to help you set up SEO tags, ensuring your pages rank better on search engines like Google. It's crucial to customize these SEO tags to align with your content and target audience.
Example: Building a Simple Landing Page
Below is an example of how you can use the provided components to build a simple landing page:
// landingPage.js
import { getSEOTags } from '@/libs/seo'
export const metadata = getSEOTags({ canonicalUrlRelative: '/' })
export default function LandingPage() {
return (
<>
<main className="min-h-screen p-12 pb-24 text-center" data-theme="dark">
<section className="mx-auto max-w-xl space-y-8">
<h1 className="text-3xl font-extrabold md:text-4xl">
Food recipes you'll love 🥦
</h1>
<p className="text-base-content/80 text-lg leading-relaxed">
Our AI will generate recipes based on your preferences. New recipes
will be added every week!
</p>
<img
src="https://images.unsplash.com/photo-1518843875459-f738682238a6?ixlib=rb-4.0.3&ixid=M3wxMjA3fDB8MHxwaG90by1wYWdlfHx8fGVufDB8fHx8fA%3D%3D&auto=format&fit=crop&w=3484&q=80"
alt="Vegetables"
width={500}
height={250}
className="mx-auto rounded-lg"
/>
<button className="btn btn-primary btn-wide">Get started</button>
</section>
</main>
</>
)
}
Authentication
Integrating authentication with Clerk is straightforward and essential for securing your application. Here’s how to set up Clerk authentication in your Speed Build Marketplace.
Setting Up Clerk Authentication
You need to set up Clerk's environment variables in your .env file to integrate authentication services. This ensures that your API keys are kept secure and are not hardcoded into your codebase.
- Go to your Clerk account and find the environment variables and add them to the .env file.
.env
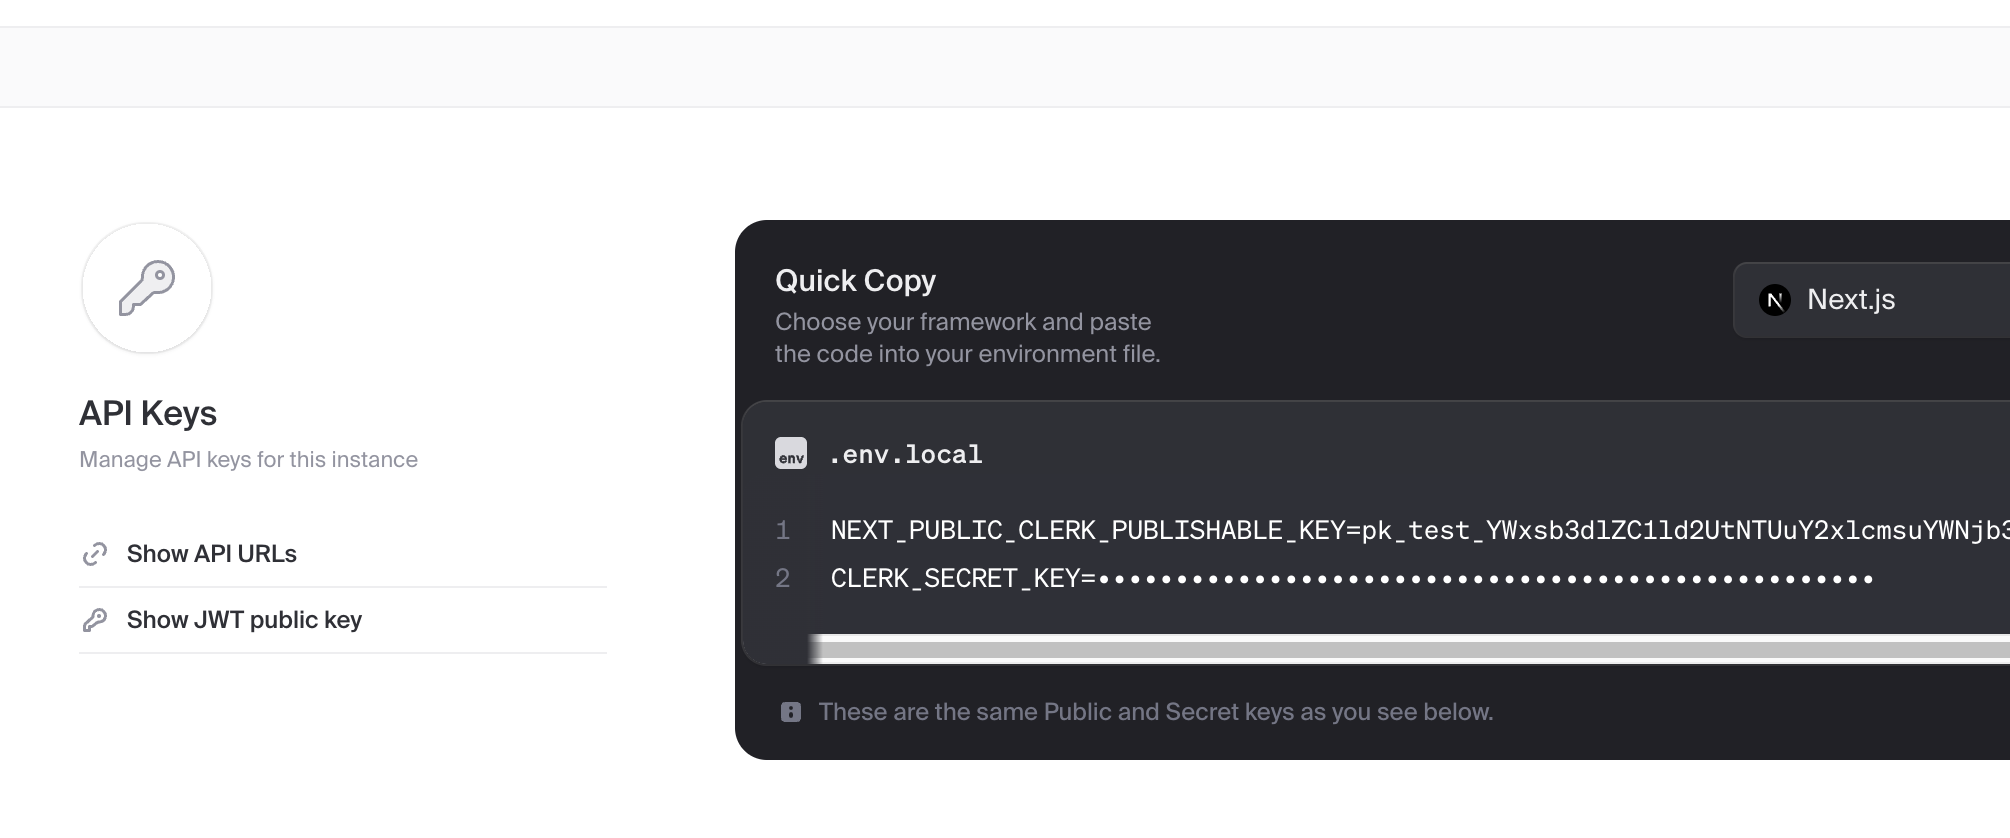
NEXT_PUBLIC_CLERK_PUBLISHABLE_KEY=pk_test_something
CLERK_SECRET_KEY=sk_test_something
Important: Make sure to use test keys (pk_test_something and sk_test_something) while developing. Replace these with your production keys only when deploying to a live environment.
Below is an example screenshot from the Clerk dashboard, highlighting where you can find these keys:
Great, and once you have done this, then the auth configuration is fixed , as the ClerkProvider is already wrapping the whole application as seen below:
/app/layout.js
import { ClerkProvider } from "@clerk/nextjs";
...
export default function RootLayout({ children, params }) {
  return (
    <ClerkProvider>
      <html lang="en">
        <body>{children}</body>
        <GoogleTagManager gtmId={process.env.NEXT_PUBLIC_GTM_ID} />
      </html>
    </ClerkProvider>
  )
}
...
Models
Models are placed in the models folder. Below is an example of a user model schema using Mongoose:
import mongoose from 'mongoose'

// USER SCHEMA
const userSchema = mongoose.Schema(
  {
    name: {
      type: String,
    },
    email: {
      type: String,
    },
    image: {
      type: String,
    },
  },
  {
    timestamps: true,
  },
)

export default mongoose.models.User || mongoose.model('User', userSchema)
API Calls
All API calls are placed within the /app/api folder. Each route is represented by a folder, with a route.js file inside that defines the API logic for that route.
Example API Call
Here's a simplified example of an API call in route.js:
import { NextResponse } from 'next/server'
import connectMongo from '../../../libs/mongoose'
import User from '../../../models/User'
import { auth } from '@clerk/nextjs/server'

export async function GET(req) {
  try {
    const { userId } = auth()
    if (!userId) {
      return NextResponse.json({ error: 'Unauthorized' }, { status: 401 })
    }

    await connectMongo()
    const user = await User.findOne({ clerkUserId: userId })
    if (!user) {
      return NextResponse.json({ error: 'User not found' }, { status: 404 })
    }

    return NextResponse.json({
      _id: user._id,
    })
  } catch (error) {
    console.error('Error in GET /dashboard endpoint:', error)
    return NextResponse.json(
      { error: 'Internal Server Error' },
      { status: 500 },
    )
  }
}
Explanation
- File Structure: The API call is placed in the
/app/api/your-route/route.jsfile. - Authentication: The
auth()function from@clerk/nextjs/serveris used to authenticate the user. - Database Connection: The
connectMongo()function is called to connect to the MongoDB database. - Model Usage: The
Usermodel is used to interact with theuserscollection in the database. - Response Handling: The
NextResponse.json()method is used to send JSON responses back to the client.
Components
In Speed Build Marketplace, each page is typically composed of a server component and a client component. This architecture allows for better separation of concerns and efficient data handling.
Understanding Server and Client Components
Server Component
Server components are responsible for fetching data, handling authentication, and preparing any necessary data before rendering the client component. They do not include any interactive UI logic or state management.
Example
Let's take the Hero4Server component as an example. This component fetches a video URL and passes it down to the client component.
'use server'
import HeroClient from './HeroClient'

export default async function HeroServer() {
  const heroVideo =
    'https://videos.pexels.com/video-files/2853795/2853795-uhd_2560_1440_24fps.mp4'

  return (
    <div>
      <HeroClient heroVideo={heroVideo} />
    </div>
  )
}
Client Component
Client components handle the interactive part of your UI. They are responsible for rendering the UI, managing state, and handling user interactions.
Example
The HeroClient component displays the video and includes links to explore listings and start selling.
'use client'
import Link from 'next/link'

export default function HeroClient({ heroVideo }) {
  return (
    <div className="relative bg-white">
      <main>
        <div className="relative isolate">
          <video
            className="absolute inset-0 -z-10 h-full w-full object-cover"
            src={heroVideo}
            autoPlay
            muted
            loop
            playsInline
          />

          <div
            className="absolute left-1/2 right-0 top-0 -z-10 -ml-24 transform-gpu overflow-hidden blur-3xl lg:ml-24 xl:ml-48"
            aria-hidden="true"
          >
            <div
              style={{
                clipPath:
                  'polygon(63.1% 29.5%, 100% 17.1%, 76.6% 3%, 48.4% 0%, 44.6% 4.7%, 54.5% 25.3%, 59.8% 49%, 55.2% 57.8%, 44.4% 57.2%, 27.8% 47.9%, 35.1% 81.5%, 0% 97.7%, 39.2% 100%, 35.2% 81.4%, 97.2% 52.8%, 63.1% 29.5%)',
              }}
            />
          </div>
          <div className="relative overflow-hidden bg-gray-900/50">
            <div className="relative z-10 mx-auto max-w-7xl px-6 pb-16 pt-8 sm:pt-10 lg:px-8 lg:pt-12">
              <div className="mb-8 flex justify-start sm:mb-8 md:justify-center"></div>
              <div className="mx-auto max-w-2xl gap-x-14 lg:mx-0 lg:flex lg:max-w-none lg:items-center">
                <div className="relative w-full max-w-xl lg:shrink-0 xl:max-w-2xl">
                  <h1 className="text-4xl font-bold tracking-tight text-gray-900 text-white sm:text-8xl">
                    Buy and Sell Sneakers
                  </h1>
                  <p className="mt-6 text-lg leading-8 text-gray-600 text-white sm:max-w-md lg:max-w-none">
                    Buy and sell sneakers easily at this new marketplace.
                  </p>
                  <div className="mt-10 flex flex-col items-start gap-y-2 sm:flex-row sm:items-center sm:gap-x-6">
                    <Link
                      href="/listings"
                      className="rounded-md bg-green-600 px-5 py-3 text-base font-semibold text-white shadow-sm hover:bg-green-500 focus-visible:outline focus-visible:outline-2 focus-visible:outline-offset-2 focus-visible:outline-green-600"
                    >
                      Explore all listings now
                    </Link>

                    <div className="w-full sm:flex-1">
                      <Link
                        href="/sign-up"
                        className="text-sm font-semibold leading-6 text-gray-900 text-white"
                      >
                        Or start selling <span aria-hidden="true">→</span>
                      </Link>
                    </div>
                  </div>
                </div>
              </div>
            </div>
          </div>
        </div>
      </main>
    </div>
  )
}
Dashboard Pages
Dashboard pages in the Speed Build Marketplace are organized within the /app/(dashboard) directory. Each page is placed in a folder named after the route and consists of a page.js file (the server component) and a client component.
(Dashboard) Server Component
The server component is responsible for fetching data, handling authentication, and preparing any necessary data before rendering the client component. Here’s an example of a page.js file:
import 'server-only'
import DashboardPage from './dashboardPageClientSide.js'
import { auth } from '@clerk/nextjs/server'
import { Suspense } from 'react'

const fetchUserData = async () => {
  const { getToken } = auth()
  try {
    const token = await getToken()

    if (!token) {
      console.error('Token not found')
      return { redirect: '/sign-in' }
    }

    const headers = {
      Authorization: `Bearer ${token}`,
    }

    const response = await fetch(process.env.NEXT_PUBLIC_DASHBOARD, {
      headers,
    })

    if (response.status === 401) {
      return { redirect: '/' }
    }

    if (response.ok) {
      const data = await response.json()
      return data
    } else {
      console.error('Failed to fetch user data')
    }
  } catch (error) {
    console.error('Error fetching user data:', error)
  }
}

export default async function DashboardPageServerSide() {
  const data = await fetchUserData()

  const { firstName } = data || {}

  return (
    <Suspense fallback={<div>Loading...</div>}>
      <DashboardPage firstName={firstName} />
    </Suspense>
  )
}
(Dashboard) Client Component
The client component handles the interactive part of the UI, including rendering the UI, managing state, and handling user interactions. Here’s an example of a client component:
'use client'

import { useSearchParams } from 'next/navigation'
import { useState } from 'react'
import SuccessFullAlertComponent from '../../../Components/DashboardComponents/SuccessfullAlertComponent/SuccessfullAlertComponent.js'
import ActionsComponent from '../../../Components/DashboardComponents/ActionsComponent/ActionsComponent.js'

export default function DashboardPageClientSide({ firstName }) {
  const searchParams = useSearchParams()
  const emailVerified = searchParams.get('emailVerified')
  const [showWelcomeMessage, setShowWelcomeMessage] = useState(true)

  const formattedFirstName = firstName
    ? `${firstName.charAt(0).toUpperCase()}${firstName.slice(1).toLowerCase()}`
    : ''

  return (
    <>
      {emailVerified && (
        <SuccessFullAlertComponent message={'Email verified'} />
      )}
      {showWelcomeMessage && (
        <SuccessFullAlertComponent
          message={formattedFirstName ? `Welcome!` : 'Welcome!'}
          onDismiss={() => setShowWelcomeMessage(false)}
        />
      )}
      <div className="mt-3">
        <ActionsComponent />
      </div>
    </>
  )
}
Explanation
File Structure: The API call is placed in the /app/api/your-route/route.js file.
Authentication: The auth() function from @clerk/nextjs/server is used to authenticate the user.
Database Connection: The connectMongo() function is called to connect to the MongoDB database.
Model Usage: The User model is used to interact with the users collection in the database.
Response Handling: The NextResponse.json() method is used to send JSON responses back to the client.
Client Component: The client component handles the UI and interactions, using hooks like useState, useUser, and useLocale for state management and localization.
This structure helps maintain a clear separation of concerns, with server components focusing on data fetching and authentication, and client components managing the user interface and interactions.