Database
MongoDB
- Set up a new project and deploy a cluster on MongoDB Atlas.
- In your MongoDB Atlas project, navigate to [Network Access] and click on [+ Add IP Address]. Add 0.0.0.0/0 to the [Access List Entry]. This will allow connections from your local machine as well as from production environments (such as Vercel).
- Update your
.envfile by adding your MongoDB connection string to theMONGODB_URIvariable.
Stripe
Integrating Stripe with Speed Build Marketplace allows you to handle payments efficiently and securely. For marketplaces, Stripe Connect is the recommended solution as it provides a robust framework for managing payments between buyers and sellers.
Steps to Integrate Stripe Connect
-
Create a Stripe Account:
- Sign up for a Stripe account at Stripe.
- Verify your email and complete the necessary verification steps.
-
Set Up Stripe Connect:
- In your Stripe dashboard, navigate to Connect and follow the instructions to set up your account for marketplace payments.
- Obtain your API keys from the Stripe dashboard. You will need the Publishable Key and the Secret Key.
-
Update Your .env File:
- Add the following entries to your
.envfile:
.env
STRIPE_PUBLISHABLE_KEY=your_stripe_publishable_key STRIPE_SECRET_KEY=your_stripe_secret_key - Add the following entries to your
-
Implement Payment Flows:
Use Stripe's API to handle various payment flows, such as creating charges, managing customer accounts, and handling payouts to sellers. Refer to the Stripe Connect documentation for detailed guides and examples.
SEO
Meta tags
Open the config.js file and add values for appName, appDescription, and domainName. These values will then be used as default SEO tags from your whole marketplace.
The helper /libs/seo.js adds all the important SEO tags (with your default values) to all pages because of the main /app/layout.js file.
Now here is an example. To add custom SEO tags to a page without re-writing all the tags, just do this:
/app/about/page.js
import { getSEOTags } from "@/libs/seo";
...

export const metadata = getSEOTags({
  title: "About us - Why we do what we do | Speed Build Marketplace",
  canonicalUrlRelative: "/about",
});

export default async function About() {
...
Structured Data
When relevant, add Structured Data to a page using the renderSchemaTags() function in /libs/seo.js. It helps Google understand better your website and you can be included in rich snippets. Open the component for more documentation. Here's an example:
/app/page.js
import "./globals.css";
import MainLayout from "./SpeceficLayouts/MainLayout";
import HeroServer from "../Components/MainComponents/Hero/HeroServer";
import FeaturedListingsServerComponent from "@/Components/MainComponents/FeaturedListings/FeaturedListingsServer";
import { renderSchemaTags } from "../../libs/seo";

export default async function Home() {
  return (
    <MainLayout>
      <main>
        <HeroServer />
        <FeaturedListingsServerComponent />
      </main>
      {renderSchemaTags()}
    </MainLayout>
  );
}

...
Sitemap and robots.txt
To ensure search engines can properly index your site, you need to configure the sitemap and robots.txt files.
-
Add URLs to Sitemap:
- Include your root URL as well as any other pages you have created in the sitemap file (
app/sitemap.js/ts).
- Include your root URL as well as any other pages you have created in the sitemap file (
-
Update robots.txt:
- Add the URL to the sitemap in the
robots.txtfile. For example:Sitemap: https://mydomain.com/sitemap.xml - If there are any pages you want to disallow, add them to the disallow list in the
robots.txtfile.
- Add the URL to the sitemap in the
By doing this, Next.js will generate a sitemap.xml and robots.txt file for all your pages at build time.
Integrating SendGrid with Speed Build Marketplace allows you to handle email notifications efficiently and reliably. Follow these steps to set up SendGrid for your application.
Steps to Integrate SendGrid
-
Create a SendGrid Account:
- Sign up for a SendGrid account at SendGrid.
- Verify your email and complete the necessary steps to activate your account.
-
Obtain Your API Key:
- In the SendGrid dashboard, navigate to Settings > API Keys and create a new API key with the required permissions.
- Copy the generated API key.
-
Update Your .env File:
- Add the following entries to your
.envfile:
.env
SENDGRID_KEY=your_sendgrid_api_key SENDGRID_SENDER_EMAIL=example@example.com - Add the following entries to your
Example of Using SendGrid in Your Application To send an email using SendGrid, you can use the following code snippet:
import sgMail from '@sendgrid/mail'

// Set SendGrid API Key
sgMail.setApiKey(process.env.SENDGRID_KEY)

try {
  const sellerMsg = {
    to: message.sellerId.email,
    from: process.env.SENDGRID_SENDER_EMAIL,
    subject: 'New Message Regarding Your Listing',
    html: `Hello,<br><br>
           You have received a new message from <strong>${message.firstName}</strong> regarding your listing:<br><br>
           <b>"${message.message}"</b><br><br>
           To reply, please log in to your Speed Build Marketplace account and visit the <a href="https://yourdomain.com/messages">Messages</a> section.<br><br>
           Best regards,<br>
           - Speed Build Marketplace.`,
  }

  await sgMail.send(sellerMsg)
} catch (error) {
  console.error('Error sending email:', error)
}
Google Auth
Integrating Google authentication with Clerk allows users to sign in to your application using their Google account. This setup involves configuring OAuth credentials in both Clerk and the Google Cloud Platform. For detailed step-by-step instructions, refer to the Clerk guide on setting up Google social connections.
Overview:
- Set Up Google OAuth: In the Clerk Dashboard, navigate to User & Authentication > Social Connections, and enable Google.
- Google Cloud Configuration: In the Google Cloud Platform, set up OAuth 2.0 credentials and paste the authorized redirect URI provided by Clerk.
- Client ID and Secret: After creating the OAuth client ID in Google Cloud, copy the Client ID and Client Secret into Clerk.
Ensure that you use development credentials for testing purposes and switch to production settings before going live. Always verify that your OAuth application status is set to "In Production" to prevent issues for end users.
Facebook Auth
Integrating Facebook authentication with Clerk allows users to sign in to your application using their Facebook account. This setup involves configuring OAuth credentials in both Clerk and the Facebook Developer portal. For detailed step-by-step instructions, refer to the Clerk guide on setting up Facebook social connections.
Overview: Adding social connection with Facebook to your app with Clerk is done in a few steps - you only need to set the Client ID, Client Secret, and Authorized redirect URI in your instance settings.
To make the development flow as smooth as possible, Clerk uses preconfigured shared OAuth credentials and redirect URIs for development instances - no other configuration is needed.
For production instances, you will need to create your own developer account with Facebook and generate your own App ID and App Secret.
Note: The purpose of this guide is to help you set up a Facebook developer account and a Facebook OAuth2.0 project - if you're looking for step-by-step instructions using Clerk to add Social Connection (OAuth) to your application, follow the Social connection (OAuth) guide.
Before You Start:
- You need to create a Clerk Application in your Clerk Dashboard. For more information, check out our Set up your application guide.
- You need to have a Facebook Developer account. To create one, consult the Register as a Facebook developer page.
Configuring Facebook Social Connection
Creating a Facebook App: First, you need to create a new Facebook app and enable Facebook sign-in. Follow the official Facebook instructions on how to create a Facebook app. When asked to choose an app type, make sure you select Consumer. To learn more about Facebook app types, check the Facebook App Types page.
Enabling Facebook Sign-In for Your App: At the end of the app creation wizard, you will be redirected to the app dashboard. Find the Facebook login card and click Set Up. There's no need to go through the quickstart wizard - open the Settings dropdown menu (sidebar) and click Basic.
Once you have an OAuth client ID created, click on the newly created ID under OAuth 2.0 Client IDs and copy the App ID and App Secret.
Retrieving the App ID and App Secret: In the Clerk Dashboard, go to User & Authentication > Social Connections and enable Facebook. In the modal that opens, ensure "Use custom credentials" is enabled and paste the values you obtained during the previous step.
Adding the Valid OAuth Redirect URI: Before you close the modal, copy the Authorized redirect URI. Go back to the Facebook dashboard, open the Facebook Login menu (sidebar), and click Settings. Paste the URI you copied before into the Valid OAuth Redirect URIs field. Hit Save Changes.
Don't forget to click Apply in the Clerk dashboard. Congratulations! Social connection with Facebook is now configured for your instance.
Email Verification Links
Setting up email verification is crucial for ensuring that users' email addresses are valid and to prevent spam accounts. Clerk makes it easy to integrate email verification into your application.
Within Clerk, navigate to Configure > Email, Phone, Username. Under Authentication strategies, enable the Email verification link option. This setting ensures that when users sign up, they receive an email with a link to verify their email address.
Once enabled, Clerk will automatically send an email to new users containing a verification link. Users must click this link to complete the registration process, confirming the validity of their email address. This step is essential for maintaining the integrity and security of your user base.
You can customize the email template used for verification in the Clerk Dashboard under the Emails section. This allows you to personalize the messaging and branding, providing a seamless experience consistent with your application's look and feel.
It's recommended to test the email verification process to ensure that emails are delivered correctly and that the links function as expected. Regularly reviewing your verification process and settings helps maintain high security and user experience standards.
Customer Support
Set Up Crisp for Customer Support
To provide live chat support to your users, integrate Crisp with your Speed Build Marketplace.
Create a Crisp Account
Sign up for an account at Crisp. Once logged in, create a new website and copy the website ID. You can find this in the Integrations menu under the HTML option; it's called CRISP_WEBSITE_ID.
Update Your Configuration
In your config.js file, paste your Crisp website ID under the crisp object.
// config.js
const config = {
  appName: 'Speed Build Marketplace',
  appDescription:
    'Speed Build Marketplace is everything you need to quickly build your marketplace MVP.',
  domainName: 'speedbuildmarketplace.com',
  crisp: {
    id: 'YOUR_CRISP_WEBSITE_ID', // Replace with your Crisp website ID
    onlyShowOnRoutes: ['/'], // Show Crisp chat only on specific routes
  },
  // ... other configurations
}

export default config
Ensure that the Crisp chat widget is set up to be visible on all relevant pages. You can control this with the onlyShowOnRoutes array in your config.js file.
To use Crisp, just import the component called CrispChat and include it in your component tree. Here's an example:
// Import the CrispChat component
import CrispChat from '/Components/MainComponents/CrispChat/CrispChat.js'

export default function MyApp() {
  return (
    <div>
      {/* Other components and content */}
      <CrispChat />
      {/* Other components and content */}
    </div>
  )
}
Google analytics
Integrating Google Analytics with your application is essential for tracking user interactions and understanding your audience. In this guide, we'll integrate Google Analytics using Google Tag Manager (GTM).
Steps to Integrate Google Analytics
-
Set Up Google Tag Manager:
-
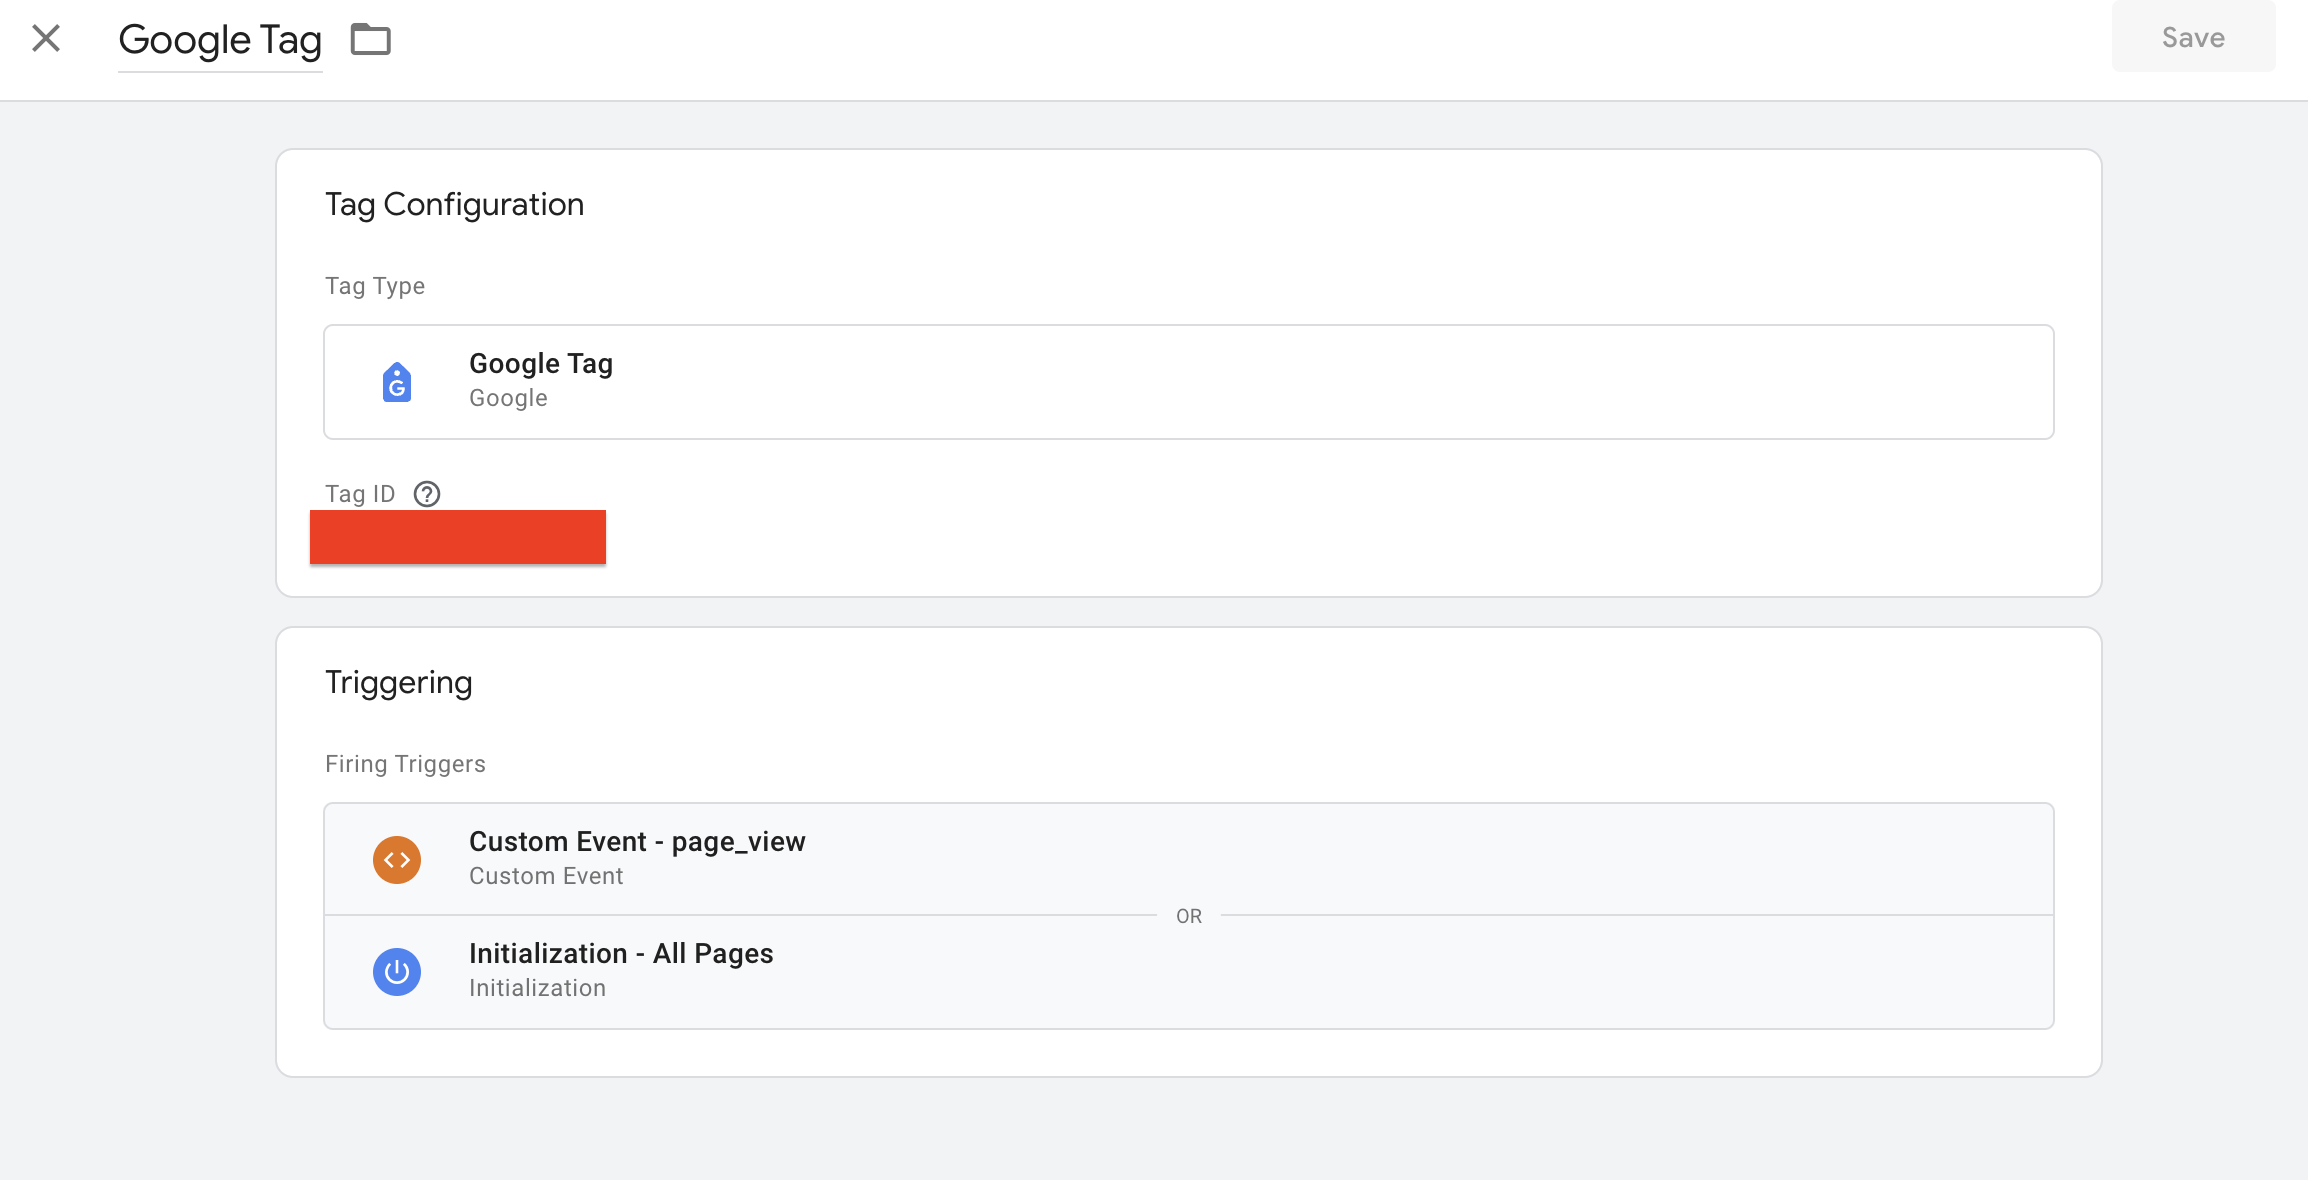
First, create an account on Google Tag Manager. Set up a new container for your application and obtain your GTM ID (e.g.,
GTM-XXXXXX). -
It's crucial to ensure that the GTM tag is firing correctly on all pages of your application. You can verify this using browser extensions like Tag Assistant or by checking your Google Analytics dashboard for real-time activity. Below is a screenshot showing a correctly firing GTM tag:
-
- Update Your .env File:
Add the GTM ID to your .env file. This keeps your GTM ID secure and allows you to manage it without hardcoding values into your codebase.
.env
NEXT_PUBLIC_GTM_ID=GTM-XXXXXX
That is it.
The root layout file will now make sure that the Google tag is firering on all pages :
/app/layout.js
import { GoogleTagManager } from '@next/third-parties/google'
...
export default function RootLayout({ children, params }) {
  return (
    <ClerkProvider>
      <html lang="en">
        <body>{children}</body>
        <GoogleTagManager gtmId={process.env.NEXT_PUBLIC_GTM_ID} />
      </html>
    </ClerkProvider>
  )
}
...
Error Handling
Handling errors gracefully is crucial for providing a good user experience. In Speed Build Marketplace, error handling is structured to manage both JavaScript errors and HTTP errors effectively.
JavaScript Errors
JavaScript errors are managed globally using a high-level component. This approach ensures that any unhandled exceptions are caught and presented in a user-friendly manner. The /app/error.js component is responsible for catching and displaying these errors, allowing the application to recover gracefully from unexpected issues.
404 Error (Not Found)
The application includes a dedicated component for handling 404 errors, which occur when a user tries to access a page that doesn't exist. This is managed by the /app/not-found.js component.
Here's an example of how the 404 page is structured:
import Link from 'next/link'
import MainLayout from './SpeceficLayouts/MainLayout'

export default function NotFound() {
  return (
    <>
      <MainLayout>
        <main className="grid min-h-screen place-items-center bg-white px-6 py-24 sm:py-32 lg:px-8">
          <div className="text-center">
            <p className="text-base font-semibold text-gray-600">404</p>
            <h1 className="mt-4 text-3xl font-bold tracking-tight text-gray-900 sm:text-5xl">
              Page not found
            </h1>
            <p className="mt-6 text-base leading-7 text-gray-600">
              Sorry, we couldn’t find the page you’re looking for.
            </p>
            <div className="mt-10 flex items-center justify-center gap-x-6">
              <Link
                href="/"
                className="rounded-md bg-gray-600 px-3.5 py-2.5 text-sm font-semibold text-white shadow-sm hover:bg-gray-500 focus:outline-none focus:ring-2 focus:ring-gray-600 focus:ring-offset-2"
              >
                Go back home
              </Link>
              {/* Update the href to your support link */}
              <span className="text-sm font-semibold text-gray-500">
                <p>Or contact us at </p>
                <span className="font-bold hover:underline">
                  example@example.com
                </span>
              </span>
            </div>
          </div>
        </main>
      </MainLayout>
    </>
  )
}